Showing posts with label software. Show all posts

Sunday, August 14, 2011

New version of programs to integrate Stata with an external text editor

I released a new version of the rundo and rundolines programs to integrate the Stata statistical package with an external text editor. Version 4 of the programs supports Stata 12, released in July 2011, as well as previous versions of Stata. Users who upgrade from an older version of Stata to Stata 12 must install the new rundo and rundolines programs. The old programs are not compatible with Stata 12 because some keyboard shortcuts in Stata have changed. Users of Stata 8 to 11 can continue to use version 3.1 of rundo and rundolines.

Related articles
External links
Friedrich Huebler, 14 August 2011, Creative Commons License
Permanent URL: http://huebler.blogspot.com/2011/08/stata.html

Sunday, April 17, 2011

Update to "Integrating Stata and external text editors"

The guide to integrating Stata with an external text editor has been revised. The rundo and rundolines programs were updated to support Stata version 11.2, which was released on 30 March 2011. Some links in the guide were also updated.

External links
Related articles
Friedrich Huebler, 17 April 2011, Creative Commons License
Permanent URL: http://huebler.blogspot.com/2011/04/stata.html

Tuesday, August 31, 2010

Update to "Integrating Stata and external text editors"

The guide to integrating the Stata statistical package with an external text editor has been updated. One more screenshot was added to the instructions and the list of supported editors was revised. The rundo and rundolines programs have been confirmed to work with Crimson Editor, EditPlus, EmEditor, Notepad++, PSPad, TextPad, TeXnicCenter, and UltraEdit. In addition, previous versions of the programs were reported to work with gVim, Hidemaru, jEdit, SciTE, Vim, and WinEdt.

External links
Related articles
Friedrich Huebler, 31 August 2010, Creative Commons License
Permanent URL: http://huebler.blogspot.com/2010/08/stata.html

Sunday, April 5, 2009

New version of programs to integrate Stata and external text editors

Version 3.1 of the rundo and rundolines programs to integrate Stata and external text editors has been released. The new version corrects a bug in version 3 of the rundo program, which had pointed to the wrong INI file. As a result of this bug, changed settings in rundo.ini had no effect on the execution of the program. Version 3.1 also updates the code of the rundo and rundolines programs to version 10.1 of Stata. Older versions of Stata are still supported.

Related articles
External links
Friedrich Huebler, 5 April 2009, Creative Commons License
Permanent URL: http://huebler.blogspot.com/2009/04/stata.html

Thursday, January 8, 2009

Update to Stata guide

I revised the guide to integrating the Stata statistical package with an external text editor. The programs described in the guide allow the execution of Stata commands directly from an external editor. The programs have been confirmed to work under Windows Vista, using the same installation procedure as for Windows XP. Most graphs and maps on this site were created with Stata.

Related articles
External links
Friedrich Huebler, 8 January 2009, Creative Commons License
Permanent URL: http://huebler.blogspot.com/2009/01/stata.html

Sunday, June 22, 2008

Updates to two Stata guides

A new section on troubleshooting was added to the guide to integrating Stata and external text editors. The guide describes a set of programs that can be used to run Stata commands from an external text editor. The installation of these programs is straightforward and users should not encounter any problems if the installation instructions are followed exactly. In case the programs do not work, the new section offers simple steps to track down the source of the problem. The guide to reading Statalist with Gmail was also updated to include information on a new "fixed width font" feature of Gmail.

Friedrich Huebler, 22 June 2008, Creative Commons License
Permanent URL: http://huebler.blogspot.com/2008/06/stata-guides.html

Sunday, April 27, 2008

Guide to integrating Stata and external text editors

Download: rundo4.zip (242 KB), rundolines4.zip (243 KB), updated 14 August 2011

Table of contents

1. Introduction
2. Requirements
3. Installation
4. Using the programs
5. Known problems and troubleshooting
6. Acknowledgments
7. History of the programs

1. Introduction

Stata is a statistical package that is available for Windows, Macintosh and Unix operating systems. This guide addresses some shortcomings of the text editor that is part of the Stata package. Stata's Do-File Editor is fully integrated and commands can be executed directly from the editor with a keyboard shortcut or the click of a button. External editors often have a richer set of features, including syntax highlighting, but they lack integration with Stata.

This document describes how external text editors can be integrated with Stata in a way similar to the Do-File Editor. Two free programs are offered for this purpose: rundo.exe allows the execution of complete Stata do-files from an external editor, and rundolines.exe allows the execution of selected Stata commands from an external editor. Both programs can be installed and used together or individually.

2. Requirements
  • MS Windows: The programs were tested with Windows XP, Windows Vista and Windows 7 and should work with older versions of Windows. Macintosh and Unix operating systems are not supported.
  • Stata: The programs were tested with Stata versions 8, 9, 10 and 11 (up to version 11.2). Support for Stata 12 was added in August 2011.
  • Text editor: The programs were tested with Notepad++ 4.8.2 and later versions. They have also been confirmed to work with ConTEXT, Crimson Editor, EditPlus, EmEditor, PSPad, TextPad, TeXnicCenter, and UltraEdit. In addition, previous versions of the programs were reported to work with gVim, Hidemaru, jEdit, SciTE, Vim, and WinEdt.
  • rundo.exe version 4 and rundolines.exe version 4: Download rundo4.zip (242 KB) and rundolines4.zip (243 KB).
Please contact the author at fhuebler@gmail.com if you use the programs with any editor besides ConTEXT, Crimson Editor, EditPlus, EmEditor, Notepad++, PSPad, TextPad, TeXnicCenter, and UltraEdit, so that the list of supported text editors can be updated. Thank you.

3. Installation

The integration of an external text editor with Stata can be accomplished with three simple steps:
  1. Download and extract the rundo and rundolines programs.
  2. Edit the INI files.
  3. Find a way to call rundo.exe and rundolines.exe from the text editor with a keyboard shortcut, a menu entry, or an icon in the toolbar.
Step 1: Download the rundo and rundolines programs and save the contents of the two ZIP files anywhere on your computer. One suggested location is the personal ADO directory of Stata, usually C:\ado\personal\. Each ZIP archive contains three files: the executable, the source code, and an INI file.

The programs were written and compiled with AutoIt version 3.2.12.1. Users who prefer to compile the programs themselves can do so with the included source code.

Step 2: Edit the INI files for the rundo and rundolines programs. rundo.ini and rundolines.ini are identical and list six options that must be edited to match the user's setup.
  • statapath is the path to the Stata executable, enclosed in quotes, for example "C:\Program Files\Stata11\StataSE.exe".
  • statawin is the title of the Stata window, also enclosed in quotes, for example "Stata/SE 11.2". The window title is shown in the upper left corner of the main Stata program window (see Figure 1 with the program window of Stata/SE 10.1).
  • statacmd is the keyboard shortcut to the Stata command window. In Stata versions 8 to 11, the shortcut is Ctrl+4 (written as "^4" in the INI file). In Stata 12, released in July 2011, the shortcut was changed to Ctrl+1 (written as "^1" in the INI file).
  • clippause is a pause after Stata commands are copied to the Windows clipboard.
  • winpause is a pause between window-related operations, for example between the switch from the text editor to Stata.
  • keypause is the pause between individual key strokes that are sent to Stata.
The last three options are specified in milliseconds. The default values should work for most users but they can be reduced for a faster execution of the rundo and rundolines programs. If the pauses are too short, the programs fail and no commands are passed on to Stata.

Figure 1: Stata program window
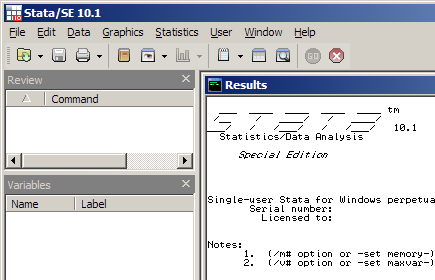
Stata program window with title in upper left corner

Step 3: Find a way to call rundo.exe and rundolines.exe from the text editor with a keyboard shortcut, a menu entry, or an icon in the toolbar. This example shows how the programs can be linked to Notepad++, a free text editor for MS Windows. For Stata users, an optional language file for syntax highlighting is available in the Notepad++ download section. Other text editors can also be integrated with Stata if they provide an option to call the rundo and rundolines programs; many editors have this capability.
  1. rundolines:
    • In Notepad++, go to the Run menu and select Run.
    • Browse to rundolines.exe and enclose the entire path in quotes. For example, if rundolines.exe is saved in the directory C:\ado\personal\, the complete entry in the Run box of Notepad++ would be:
      "C:\ado\personal\rundolines.exe"
    • Click Save.
    • Enter a name, for example "Run do-lines", and select a shortcut, for example F9 (see Figure 2).
    • Click OK, click Cancel.
  2. rundo:
    • In Notepad++, go to the Run menu and select Run.
    • Browse to rundo.exe enclose the entire path in quotes. Next, add the text "$(FULL_CURRENT_PATH)" (with quotes) after the path to rundo.exe. For example, if rundo.exe is saved in the directory C:\ado\personal\, the complete entry in the Run box of Notepad++ would be:
      "C:\ado\personal\rundo.exe" "$(FULL_CURRENT_PATH)"
    • Click Save.
    • Enter a name, for example "Run do-file", and select a shortcut, for example F10 (see Figure 3).
    • Click OK, click Cancel.
Figure 2: Notepad++ shortcut setup for rundolines program
Notepad++ dialog to add the rundolines program

Figure 3: Notepad++ shortcut setup for rundo program
Notepad++ dialog to add the rundo program

4. Using the programs

After the programs have been successfully installed, Stata commands can be executed directly from the text editor. In the case of Notepad++, press F10 (or any other assigned shortcut) to run a saved Stata do-file. To run only a few commands, highlight the relevant lines in the editor and then press F9 (or any other assigned shortcut).

The rundo program sends the path of the do-file to the Stata Command window, preceded by the word "do" and followed by Enter. If more than one instance of Stata is open, the do-file is executed in the Stata window that was most recently active. If Stata is not open, the rundo program starts Stata and then runs the do-file. Note that a do-file must be saved before the rundo program is called because it looks for the saved version of the document that is currently being edited. An alternative would be to first select the entire text in the editor and then call the rundolines program, which passes all selected lines to Stata.

The rundolines program saves the highlighted lines in a temporary file and then sends the path of the temporary file to the Command window in Stata, preceded by "do" and followed by Enter. If more than one instance of Stata is open, the commands are executed in the Stata window that was most recently active. If Stata is not open, the rundolines program starts Stata and then runs the selected commands.

The rundo and rundolines programs are self-contained, they do not create any files besides a temporary file with Stata commands, and they make no changes to the Windows registry. As the source code shows, the only function of the programs is to copy commands from the text editor and pass them on to Stata. However, both programs overwrite the contents of the Windows clipboard directly after they are executed because the clipboard is used to store the path to the Stata do-file.

5. Known problems and troubleshooting

Users who encounter problems during the installation or execution of the rundo and rundolines programs are advised to follow the troubleshooting steps in this section.

Known problem 1: If the rundo and rundolines programs fail, the clippause, winpause and keypause values may be too small. In that case, edit rundo.ini and rundolines.ini, increase the pause values (especially for winpause and clippause), and then run the programs again. For best results, the values in the INI files are long enough so that the rundo and rundolines programs do not fail and short enough to avoid noticeable delays before the execution of the commands in Stata. The default values in the INI file should work on most systems.

Known problem 2: A second known problem involves keyboard shortcuts to rundo.exe and rundolines.exe that use combinations with Shift or Ctrl, for example Shift+F9 or Ctrl+F10. Such shortcuts can result in a "stuck" Shift or Ctrl key in Stata. This problem affects Notepad++ and other editors. Shortcuts without Shift or Ctrl are therefore preferred.

Known problem 3: After an update of Stata, for example from version 11.0 to version 11.1, the rundo and rundolines programs may stop functioning if the title of the Stata window has changed (see Figure 1). If this is the case, edit the statawin entries in the rundo.ini and rundolines.ini files to reflect the correct window title.

Troubleshooting: The rundo and rundolines programs should work if the installation instructions are followed exactly. If the programs do not work, please use the steps below to test your setup. I recommend testing the rundolines program first because its internal code is less complicated than the code for the rundo program.
  1. Save rundolines.exe and rundolines.ini in the same folder, as described in Step 1 of the installation instructions above. Do not edit and recompile the AU3 file.
  2. Edit the rundolines INI file as described in Step 2 of the installation instructions.
  3. Add a link to Notepad++ as described in Step 3 of the installation instructions.
  4. Start Stata.
  5. Start Notepad++ and type one or more Stata commands, for example "dir" (without quotes).
  6. Highlight the Stata commands in Notepad++ with the mouse or by pressing Ctrl+A.
  7. Press F9 (or any other shortcut that was assigned to rundolines.exe) to call the rundolines program. Stata should now run the commands from Notepad++. If the commands are not executed, the rundolines program cannot find Stata because the window title in the INI file is incorrect. If this is the case, edit rundolines.ini to match the title of the Stata program window, as shown in the installation instructions. For example, note the difference between "Stata" and "Stata/SE". Save the INI file and repeat steps 4 to 7 until it is possible to run commands from Notepad++ in a copy of Stata that is already open. Move on to the next step.
  8. Close Stata but keep Notepad++ open.
  9. Highlight all Stata commands in Notepad++ with the mouse or by pressing Ctrl+A.
  10. Press F9 (or any other shortcut assigned to rundolines.exe) to call the rundolines program. Stata should now start and run the commands from Notepad++. If Stata does not start, review the rundolines.ini file and make sure that the path to the Stata executable is correct. For example, note the difference between wstata.exe and wsestata.exe. Save the INI file and repeat steps 8 to 10.
When the rundolines program works as expected, the troubleshooting steps can be repeated for the rundo program. However, rundo.exe is more complex than rundolines.exe and may not be compatible with as many editors as the rundolines program. This possible limitation can be overcome by using rundolines instead of rundo: to run an entire Stata do-file simply highlight all text in the editor (usually by pressing Ctrl-A) and then call rundolines.exe.

6. Acknowledgments

The rundo and rundolines programs are based on previous work by Dimitriy Masterov and Eva Poen. Masterov demonstrated in a post to the Stata mailing list how a do-file can be executed from Vi. Poen showed how individual lines can be executed from WinEdt. Nicholas Winter suggested changes to the programs that made them more efficient and solved some problems with the Windows clipboard. Jeffrey Arnold described how INI files can be used to set program parameters, making it possible to distribute precompiled and thus more user-friendly versions of the rundo and rundolines programs.

Others tested the programs with different editors, suggested modifications, or provided general feedback. For this, I would like to thank the following persons: Alexey Bessudnov, Nicholas Cox, Marcos Delprato, Matthew Forbes, Ari Friedman, Stefan Gawrich, Masakazu Hojo, Changhwan Kim and Haebong Woo, Keith Kranker, Randall Lewis, Kieran McCaul, Salmai Qari, Tomoyo Sakiyama, Alonso Sánchez, Raul Sanchez, Sven-Oliver Spieß, Timm Sprenger, Francisco Tschen, Renato Vargas, Robert White, Ansgar Wolsing, Amanda Tzy-Chyi Yu, and Markus Zielonka.

7. History of the programs
  • July 2004: First version of rundolines.au3 sent to the Stata mailing list (see Statalist archive).
  • October 2004: First version of this guide, with both scripts, released as part of "Some notes on text editors for Stata users".
  • March 2005: Scripts revised to work with Stata 7 and 8.
  • March 2005: Expanded guide added to my blog on international education statistics.
  • April 2005: Guide and scripts added to my website, with direct download links.
  • 6 June 2005: Version 2.0 of scripts released, with support for Stata 9. The scripts are now compatible with Stata 7, 8, and 9. Scripts work with more than one instance of Stata. Scripts no longer rely on the built-in editor of Stata. New version of this guide.
  • 8 June 2005: Version 2.1 of scripts released. Fixed problem with the clipboard that was reported by some users: scripts no longer attempt to restore clipboard or text in Stata Command window.
  • 30 June 2005: Version 2.1.1 of rundolines script released, with minor bug fix related to clipboard.
  • 26 September 2005: Version 2.2 of scripts released. The scripts are now compatible with Stata 9.1, released on 15 September 2005.
  • 22 June 2006: New section added to the guide: Supported editors.
  • 28 January 2007: The list of supported editors now includes EmEditor, gVim, Hidemaru, jEdit, Notepad++, SciTE, TextPad, Vim, UltraEdit, and WinEdt.
  • 26 April 2008: The following editors have been confirmed to work with the scripts: Crimson Editor, EditPlus, EmEditor, gVim, Hidemaru, jEdit, Notepad++, SciTE, TextPad, Vim, UltraEdit, and WinEdt.
  • 27 April 2008: Version 3 of the rundo and rundolines programs was released. The programs are now precompiled and no longer require installation of AutoIt. On the occasion of the new release, the previous guide to integrating Stata with external text editors was replaced by a new version of the guide.
  • 22 June 2008: Section on troubleshooting added to this guide.
  • 12 October 2008: The rundo and rundolines programs have been confirmed to work with Windows Vista. The acknowledgments section of this guide was expanded.
  • 8 January 2009: The section on known problems and other parts of the guide were revised.
  • 30 March 2009: Version 3.1 of the rundo and rundolines programs was released, with a bugfix. Version 3 of rundo.exe pointed to rundolines.ini instead of rundo.ini. Users who had only installed the rundo program received an error message when they tried to execute a do-file. The code of rundo.exe and rundolines.exe was also updated to version 10.1 of Stata. Both programs continue to work with older versions of Stata.
  • 31 August 2009: INI files updated to support Stata 11.
  • 17 April 2011: INI files updated to support Stata 11.2.
  • 14 August 2011: Version 4 of the rundo and rundolines programs was released. The new programs support Stata 12, released in July 2011. To be compatible with all versions of Stata, it was necessary to add an option to specify the keyboard shortcut to the Stata command window. In Stata versions 8 to 11 the keyboard shortcut is Ctrl+4, in Stata 12 it is Ctrl+1. Users who upgrade from an older version of Stata to Stata 12 must install version 4 of the rundo and rundolines programs. Users of Stata 11 or previous versions of Stata can continue to use version 3.1 of the programs, which have been archived at these links: rundo3.zip (240 KB), rundolines3.zip (240 KB).
Related articles
External links
Friedrich Huebler, 27 April 2008 (edited 14 August 2011), Creative Commons License
Permanent URL: http://huebler.blogspot.com/2008/04/stata.html
Sunday, April 1, 2007

Updates to two Stata guides

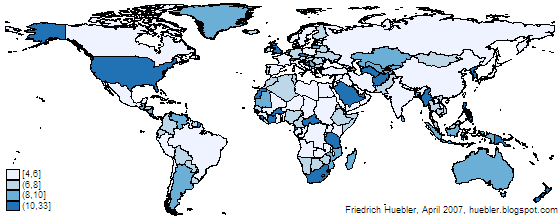
Two Stata guides on this site have been updated. The guide to creating maps with Stata now covers the recently released module spmap by Maurizio Pisati, an update to his tmap module. Both spmap and tmap are free add-ons for the Stata statistical package. The guide to creating PNG images with Stata was also revised.

Map created with spmap in Stata: length of country names
Example map created with spmap in Stata

Related articles
Friedrich Huebler, 1 April 2007, Creative Commons License
Permanent URL: http://huebler.blogspot.com/2007/04/updates-to-two-stata-guides.html

Thursday, June 22, 2006

Update to "Integrating Stata and external text editors"

My guide to integrating Stata and external text editors has been updated. I added a new section with supported editors. So far, six editors are listed: EmEditor, Hidemaru, jEdit, TextPad, Vim, and WinEdt.

If you know of other editors that work with the AutoIt scripts described in the guide, please leave a comment below or send a message to fhuebler@gmail.com so that I can update the list of supported editors.

Friedrich Huebler, 22 June 2006 (edited 29 June 2006), Creative Commons License

Thursday, April 13, 2006

Update to "Creating maps with Stata"

The guide to Creating maps with Stata has been updated. Users of Stata 9.1 or a more recent version can now convert shapefiles directly to Stata format with a new program called shp2dta. Read the guide to learn more.

Related articles
Friedrich Huebler, 13 April 2006, Creative Commons License

Sunday, February 5, 2006

Maps with international education statistics

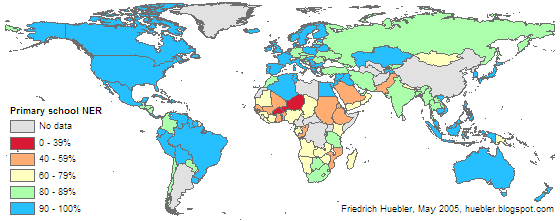
Maps are a powerful tool to visualize statistics. This site uses maps for cross-country comparisons of data like national primary school enrollment rates, shown in the map below.

Primary school net enrollment rate, 2002/2003
Map of the world showing primary school net enrollment rate for each country in 2002/03
Data source: UNESCO Institute for Statistics (UIS). 2005. Global Education Digest 2005. Montreal: UIS.

Here is a list of articles on this site that include maps with international education statistics:
My recently updated guide to creating maps with Stata shows how the Stata statistical package and its tmap module can be used to create these and other maps.

Friedrich Huebler, 5 February 2006 (edited 30 March 2006), Creative Commons License

Sunday, November 6, 2005

Guide to creating maps with Stata

The graphs and maps on this site are created with the Stata statistical package. This article describes how to make maps like those showing Millennium Development Goal regions and UNICEF regions in Stata from a shapefile.

Shapefiles store geographic features and related information and were developed by ESRI for its ArcGIS line of software. The shapefile format is used by many other programs and maps in this format can be downloaded from various sites on the Internet. Another common map format is the MapInfo Interchange Format for use with the MapInfo software. Shapefile data is usually stored in a set of three files (.shp, .shx, .dbf), while MapInfo data is stored in two files (.mif, .mid). Some sources for shapefiles and other data are listed on the website of the U.S. Centers for Disease Control and Prevention (CDC) under "Resources for Creating Public Health Maps." The CDC itself provides shapefiles for all countries with administrative boundaries down to the state level. Please note that these shapefiles are not in the public domain and are intended for use with the CDC's Epi Info software only. Other sources of shapefiles can be found with a Google search.

This guide is divided into two parts. Read part 1 if you have Stata 9 or 10 and part 2 if you have Stata 8. The creation of maps is not supported in older versions of Stata.


Part 1: Creating maps with Stata 9 or 10

To create a map with Stata 9 or 10 you need the following software.
  • Stata version 9.2 or newer.
  • spmap: Stata module for drawing thematic maps, by Maurizio Pisati. Install in Stata with the command "ssc install spmap".
  • shp2dta: Stata module for converting shapefiles to Stata format, by Kevin Crow. Install in Stata with the command "ssc install shp2dta".
  • Shapefile: For the example in this guide, download world_adm0.zip (646 KB), a shapefile that contains the boundaries of all countries of the world.
Step 1: Convert shapefile to Stata format
  • Unzip world_adm0.zip to a folder that is visible to Stata. The archive contains three files called world_adm0.dbf, world_adm0.shp, and world_adm0.shx.
  • Start Stata and run this command:
    shp2dta using world_adm0, data(world-d) coor(world-c) genid(id)
    Two new files will be created: world-d.dta (with the country names and other information) and world-c.dta (with the coordinates of the country boundaries). If you plan to superimpose labels on a map, for example country names, you should run the following command instead, which will add centroid coordinates to the file world-d.dta:
    shp2dta using world_adm0, data(world-d) coor(world-c) genid(id) genc(c)
    Please refer to the spmap documentation to learn more about labels because they are not covered in this guide.
  • The DBF, SHP, and SHX files can be deleted.
Some shapefiles are not compatible with the shp2dta command and Stata will abort the conversion with an error message. If this is the case, you can use a combination of two other programs, shp2mif and mif2dta. These programs are explained in the instructions for Stata 8 (see Step 1 and Step 2 in part 2 of this guide).

Step 2: Draw map in Stata
  • Open world-d.dta in Stata.
  • The file contains no country-specific data that could be used for this example so we will create a variable with the length of each country's name. The Stata command for this is:
    generate length = length(NAME)
  • Draw a map that indicates the length of all country names with this command:
    spmap length using "world-c.dta", id(id)
    Be patient because spmap is slow if a map contains many features.
  • The default map is monochrome, it shows Antarctica, the legend is too small and the legend values are arranged from high to low. We can draw a second map without Antarctica, with a blue palette, and with a bigger legend with values arranged from low to high:
    spmap length using "world-c.dta" if NAME!="Antarctica", id(id) fcolor(Blues) legend(symy(*2) symx(*2) size(*2)) legorder(lohi)
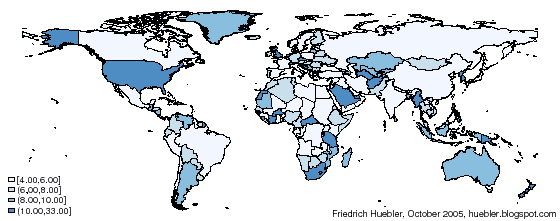
You now have the map below. Darker colors indicate longer names, ranging from 4 letters (for example Cuba and Iraq) to 33 letters (Falkland Islands (Islas Malvinas)). To customize the map further, please read the Stata help file for spmap.

Map created with spmap in Stata: length of country names
Example map created with spmap in Stata

The instructions above can be used to convert any shapefile to Stata format. If you have maps in MapInfo format you have to use another program called mif2dta that is described in part 2 of this guide.


Part 2: Creating maps with Stata 8

To create a map with Stata 8 you need the following software.
  • Stata version 8.2.
  • tmap: Stata module for thematic mapping by Maurizio Pisati. Install in Stata with the command "ssc install tmap".
  • mif2dta: Stata module for converting files from MapInfo to Stata format, also by Maurizio Pisati. Install in Stata with the command "ssc install mif2dta".
  • SHP2MIF: DOS program for converting shapefiles to MapInfo format. Go to the the website of RouteWare and click on "SHP2MIF (135 Kb)" under the heading "Converters" to get ishp2mif.zip.
  • Shapefile: For the example in this guide, download world_adm0.zip (646 KB), a shapefile that contains the boundaries of all countries of the world.
Step 1: Convert shapefile to MapInfo format
  • Unzip ishp2mif.zip. The archive contains three files, among them SHP2MIF.EXE.
  • Unzip world_adm0.zip to the same folder as SHP2MIF.EXE. The archive contains three files called world_adm0.dbf, world_adm0.shp, and world_adm0.shx.
  • Open a DOS command window: Windows Start menu - Run - "command" - OK.
  • Change the path in the command window to the folder that contains SHP2MIF.EXE and the three map files. Use the DOS command "cd" to change the path.
  • SHP2MIF works best with short file names in the 8.3 format (name up to 8 characters, extension up to 3 characters). Rename the map files with this DOS command:
    rename world_adm0.* world.*
    The map files are now called world.dbf, world.shp, and world.shx.
  • Convert the maps to MapInfo format by typing "shp2mif world" in the DOS command window. This produces two new files: WORLD.MID and WORLD.MIF.
  • Close the DOS command window.
  • The DBF, SHP and SHX files can be deleted.
Step 2: Convert MapInfo files to Stata format
  • Move the MIF and MID files to a folder that is visible to Stata.
  • Start Stata and run this command:
    mif2dta world, genid(id)
    Two new files will be created: world-Coordinates.dta (with the country boundaries) and world-Database.dta (with the country names and other information). If you plan to superimpose labels on a map, for example country names, you should run the following command instead, which will add centroid coordinates to the file world-Database.dta:
    mif2dta world, genid(id) genc(c)
    Please refer to the tmap documentation to learn more about labels because they are not covered in this guide.
  • The MIF and MID files can be deleted.
Step 3: Draw map in Stata
  • Open world-Database.dta in Stata.
  • The file contains no country-specific data that could be used for this example so we will create a variable with the length of each country's name. The Stata command for this is:
    generate length = length(name)
  • Draw a map that indicates the length of all country names with this command:
    tmap choropleth length, map(world-Coordinates.dta) id(id)
    Be patient because tmap is slow if a map contains many features.
  • The default map is monochrome, it shows Antarctica and the legend is too small. We can draw a second map without Antarctica, with a blue palette, and with a bigger legend:
    tmap choropleth length if name!="Antarctica", map(world-Coordinates.dta) id(id) palette(Blues) legsize(2)
  • To reduce the margins, display the graph again and set the margins to zero:
    graph display, margins(zero)
You now have the map below. Darker colors indicate longer names, ranging from 4 letters (for example Cuba and Iraq) to 33 letters (Falkland Islands (Islas Malvinas)). To customize the map further, please read the Stata help file for tmap and the tmap user's guide by Maurizio Pisati. The user's guide and additional tmap files can be downloaded in Stata with the commands "ssc describe tmap" and "net get tmap".

Map created with tmap in Stata: length of country names
Example map created with tmap in Stata

The instructions above can be used to convert any shapefile to Stata format. If you have maps in MapInfo format you can skip step 1 of the instructions and start with step 2.


Related articles
External linksFriedrich Huebler, 6 November 2005 (edited 30 June 2009), Creative Commons License
Permanent URL: http://huebler.blogspot.com/2005/11/creating-maps-with-stata.html

Sunday, October 2, 2005

Guide to reading Statalist with Gmail

Statalist is a mailing list for users of the Stata statistical package. To subscribe to Statalist, send an e-mail message to majordomo@hsphsun2.harvard.edu, with the text "subscribe statalist" (without quotes) in the body of the message.

In Gmail all messages are displayed with a variable-width font by default. This can make Statalist messages hard to read if they contain tables that only lign up properly with a fixed-width font. Here is a typical Stata table:
    Variable |       Obs        Mean    Std. Dev.       Min        Max
-------------+--------------------------------------------------------
age | 11258 10.46394 2.277534 7 14
school | 11209 .7712552 .4200433 0 1
In Gmail the same table would be displayed like this:

    Variable |       Obs        Mean    Std. Dev.       Min        Max
-------------+--------------------------------------------------------
         age |     11258    10.46394    2.277534          7         14
      school |     11209    .7712552    .4200433          0          1

Gmail has no setting to change the font but users of the Firefox browser can overcome this limitation by editing the file userContent.css in their Firefox profile. If the file userContent.css does not exist you can create a text file with that name and save it in your profile folder. This and other profile files can also be edited easily with the chromEdit extension for Firefox.

Adding the lines below to userContent.css overrides the Gmail settings for non-HTML mail and all simple text messages are then displayed with a fixed-width font.
div.msg div.mb {
font-family: monospace !important;
font-size: 12px !important;
}
textarea.tb {
font-family: monospace !important;
font-size: 12px !important;
}
td.ct {
font-family: monospace !important;
font-size: 12px !important;
}
The procedure is described in more detail on the site of Michael Gauthier, where I learned about this approach.

Update (22 June 2008)

As of June 2008, the instructions above are obsolete. Google has added a "Fixed width font" option to Gmail. To activate this feature, follow these steps:
  • In Gmail, click on "Settings".
  • In the Settings menu, click on "Labs".
  • Look for the "Fixed width font" option and select "Enable".
  • Click on "Save Changes".
To read a message in fixed width font, open the message, click on the "Reply" drop-down menu in the upper right corner of the message, and select "Show in fixed width font".

Related articles
Friedrich Huebler, 3 October 2005 (edited 22 June 2008), Creative Commons License

Monday, June 6, 2005

Update to "Integrating Stata and external text editors"

I have rewritten my guide to Integrating Stata and external text editors. The guide describes how a text editor can be fully integrated with the Stata statistical package, similar to the simple editor that is part of Stata. For this purpose I developed two AutoIt scripts that are now available in a new version 2.0.

New features:
  • Support for Stata 9 added, the latest release of Stata. The scripts are now compatible with Stata 7, 8, and 9.
  • The scripts work with more than one instance of Stata.
  • Scripts do no longer rely on the built-in Stata editor.
The new scripts were made possible with help from Nicholas Winter, who updated my old scripts to be compatible with Stata 9 and suggested several ways to make them more efficient. Additional acknowledgements can be found at the end of the guide.

Update, 9 June:
  • Version 2.1 of scripts released.
  • Fixed problem with the clipboard that was reported by some users.
Update, 30 June:
  • Version 2.1.1 of rundolines script released, with minor bug fix.
Related articles:
- Integrating Stata and external text editors
- Creating maps with Stata
- Creating PNG images with Stata
- Reading Statalist with Gmail

Friedrich Huebler, 6 June 2005 (edited 10 February 2006), Creative Commons License

Thursday, April 7, 2005

Guide to creating PNG images with Stata

The entry of 27 March 2005, on regional trends in primary school enrollment, contains a graph that shows how the primary school net enrollment ratio has changed between 1980 and 2000. As most graphs on this site, it was created with the Stata statistical package and saved in Portable Network Graphics (PNG) format. Stata can export graphs in PNG format but up to version 9.0 it was difficult to control the size of a saved image.

In Stata 8, graphs are drawn in a separate window and the size of an exported PNG image is identical to the size of the graph window. To create images of a specific size, for example 500 by 400 pixels, it is necessary to repeatedly resize the graph window, export the graph, and check the size of the PNG file with an image viewer.

With Stata 9.1, released on 15 September 2005, and later versions, it is possible to specify the size of graphs that are exported to PNG format with the width(#) and height(#) options (see Stata help for png_options). However, the method described in this article offers some advantages because it can create graphs that are antialiased.

The alternative method to create PNG files was suggested to me by Stata technical support: export the graph from Stata to a PostScript file and convert this file to a PNG image. The conversion from PostScript to PNG format can be done with a free software package called Ghostscript. By using Stata in combination with Ghostscript it is possible to automate the creation of PNG files that have specific dimensions and that are antialiased. The difference in image quality is shown in the two figures below.

PNG graph exported from Stata
Example for a PNG graph exported from Stata

The graph above was directly exported from Stata in PNG format with the graph export command. The graph below was exported from Stata as a PostScript file and then converted to PNG format with Ghostscript. The quality of the text is better in the PNG file created by Stata. On the other hand, the trendlines in the image created by Ghostscript appear smoother because Ghostscript supports antialiasing.

PNG graph converted from PostScript format
Example for a PNG graph converted from PostScript format

Ghostscript is released in two versions with different licences, as AFPL Ghostscript and GPL Ghostscript, but since July 2006 both versions are based on the same code. Download Ghostscript, install it on your computer, and identify the path to the Ghostscript executable. You can then adapt the Stata do-file below to create a PNG image. The example uses the auto dataset that is part of Stata to create a scatter plot with the dimensions 500 by 400 pixels.

Stata do-file to create a PNG graph with Ghostscript
* Load dataset
sysuse auto

* Set options for PostScript export
graph set ps pagesize custom
graph set ps pagewidth 5
graph set ps pageheight 4
graph set ps tmargin 0
graph set ps lmargin 0
graph set ps logo off
graph set ps fontface Helvetica

* Draw graph and export to PostScript file
scatter mpg weight, xsize(5) ysize(4)
graph export "scatter.ps"

* Convert PostScript file to PNG format
#delimit ;
shell "C:\Program Files\gs\gs8.56\bin\gswin32c.exe"
-dSAFER -dBATCH -dNOPAUSE
-r100 -g500x400 -sDEVICE=png16m
-dGraphicsAlphaBits=4 -dTextAlphaBits=4
-sOutputFile="scatter.png" "scatter.ps";
After the dataset is loaded, several options for exporting to PostScript are set. The width and height of the image are controlled with the pagewidth and pageheight options. Here, the options specify a graph 5 inches wide and 4 inches high. For an explanation of the other options type whelp ps_options in Stata.

The scatter command draws the graph. The width and height are again specified in inches, this time with the xsize and ysize options. The graph is then exported to a PostScript file.

Finally, Ghostscript is called with a shell command. At this point you have to enter the path to the Ghostscript executable on your computer. Identify the location of gswin32c.exe (by default, Ghostscript is installed in "C:\Program Files\gs\") and enter the full path in quotes following the shell command. The size of the graph is specified with the options -r100 (the resolution in pixels per inch) and -g500x400 (the dimensions of the PNG graph). The options -dGraphicsAlphaBits=4 and -dTextAlphaBits=4 control the antialiasing. The option -dGraphicsAlphaBits=2 sometimes works better because straight lines are less blurred; the PNG graph above was in fact created with -dGraphicsAlphaBits=2. The filename of the PNG graph is set with the -sOutputFile switch, and the filename of the PostScript source follows last.

The commands above were tested under Windows XP with GPL Ghostscript 8.56 and Stata versions 8.2, 9.2, and 10.

Related articles
External links
Friedrich Huebler, 7 April 2005 (edited 27 April 2008), Creative Commons License
Permanent URL: http://huebler.blogspot.com/2005/04/creating-png-images-with-stata.html

Thursday, March 10, 2005

Guide to integrating Stata and external text editors (archived version)

As of 27 April 2008, this document is no longer maintained and has been replaced by a new guide to integrating Stata and external text editors. The programs described below were replaced by new, precompiled versions that no longer require the installation of AutoIt. Please change your links to the new guide: http://huebler.blogspot.com/2008/04/stata.html.


Table of contents

Updates to this guide
Introduction
Requirements
Script 1: Run a do-file from an external editor
Script 2: Run individual commands from an external editor
Supported editors
History of the scripts
Known problems
Acknowledgments

Updates to this guide

Introduction

Stata is a statistical package for research professionals of all disciplines, from biostatisticians to political scientists. Stata is available for the Windows, Macintosh, and Unix platforms. For more information, go to the official Stata website.

This guide addresses some shortcomings of the text editor that is part of the Stata package and that is used to write programs, or do-files, as they are called in Stata. The Do-file Editor of Stata has one advantage over external editors: it is fully integrated with Stata and commands can be executed directly from the editor, with a keyboard shortcut or the click of a button. External editors often have a richer set of features, including syntax highlighting, but they lack integration with Stata.

This document shows how external text editors can be integrated with Stata in a way similar to the Do-file Editor. This can be accomplished with AutoIt, a free, open source scripting language designed for automating tasks in Windows. (AutoIt is not available for other platforms.)

Requirements

Software needed:
  • Stata version 7, 8, 9, or 10. Older versions of Stata may also work but have not been tested.
  • AutoIt: Download and install on your computer. At the time of writing, the latest version was v3.1.1, released in April 2005.
  • Text editor: The scripts were tested with EmEditor (the latest version at the time of writing was 4.13) and TextPad but they should work with other editors after minor modifications. A list of supported editors can be found near the end of this guide.
Two AutoIt scripts are shown below. The first script runs an entire do-file from a text editor. The second script runs selected lines from an editor. The following steps describe how the scripts can be used to integrate an external text editor with Stata.
  1. Modify the scripts if necessary (see the comments below) and save them as text files with the extension AU3, for example as rundo.au3 and rundolines.au3.
  2. Compile the scripts: There are two ways to do this (see the AutoIt help file), either with the "Compile script to .exe" program in the AutoIt v3 program group, or by right-clicking on an .au3 file and selecting "Compile script" from the context menu.
  3. Find a way to call the compiled scripts (in this example, rundo.exe and rundolines.exe) from your text editor with a keyboard shortcut, a menu entry, or an icon in the toolbar.

In the case of EmEditor, the scripts can be called with the External Tools feature. Go to the Tools menu and select External Tools and then Customize Tools. Click on New and enter the information for the first script: Title (e.g., "Run do-file"), Command (the full path to the compiled script), and Icon Path (e.g., the path to the Stata executable, but any other icon can be used). [Additional step for Script 1 (run do-file): Enter the text "$(Path)" (with quotation marks) in the field Arguments. This sends the path of the saved do-file to the AutoIt script.] Click on OK and again OK. Go to the Tools menu and select Customize Toolbars. Select the desired toolbar and click on Customize. Add the new icon to the toolbar and click on Close. Repeat the steps for the second script; select a different icon so that the two scripts can be distinguished easily. To call a script click on one of the two new icons in the EmEditor toolbar.

With TextPad the scripts can also be called by adding them to the toolbar. Go to Configure, Preferences, Tools, click Add, and browse to the compiled AutoIt script. [The parameter $File is needed for Script 1 only.] Then right-click on the toolbar, select Customize, Commands, add an icon for the script, and move the icon to the TextPad toolbar.


Script 1: Run a do-file from an external editor (download this script)

; AutoIt v3 script to run a Stata do-file from an external text editor.
; Version 2.2, Friedrich Huebler (fhuebler at gmail.com), 26 September 2005.
; Updated by Nicholas Winter (nw53 at cornell.edu), 25 May 2005.
; Adapted from a script by Dimitriy V. Masterov
; (dvmaster at lily.src.uchicago.edu), 23 June 2004.
; AutoIt is available at http://www.autoitscript.com/autoit3/.

; Declare variables
Global $statapath, $statawin, $dofile

; NOTE: Edit $statapath and $statawin before script is compiled
; Path to Stata executable
$statapath = "C:/Program Files/Stata9/wsestata.exe"
; Title of Stata window
$statawin = "Stata/SE 9.1"

; EXAMPLE: For Intercooled Stata 8.2 delete preceding block and use commands below
; $statapath = "C:/Program Files/Stata8/wstata.exe"
; $statawin = "Intercooled Stata 8.2"

; NOTE: Edit this block of commands to match the editor used
; EmEditor or TextPad: path of do-file is passed to AutoIt
$dofile = $CmdLine[1]

; Alternative method to obtain path of do-file with EmEditor
; Get path of do-file from title of EmEditor window
; $dofile = WinGetTitle("")
; Remove unwanted text from window title to keep path only
; $dofile = StringReplace($dofile," - EmEditor","")

; Alternative method to obtain path of do-file with TextPad
; Get path of do-file from title of TextPad window
; $dofile = WinGetTitle("")
; Remove unwanted text from window title to keep path only
; $dofile = StringReplace($dofile,"TextPad - ","")
; $dofile = StringReplace($dofile,"[","")
; $dofile = StringReplace($dofile,"]","")

; If more than one Stata window is open, the window
; that was most recently active will be matched
Opt("WinTitleMatchMode",2)

; Reduce SendKeyDelay and WinWaitDelay to speed up script
Opt("SendKeyDelay", 1)
Opt("WinWaitDelay", 200)

; Check if Stata is already open, run it if not
If WinExists($statawin) Then
  WinActivate($statawin)
  WinWaitActive($statawin)
  ; Activate Stata Command Window and select text (if any)
  Send("^4")
  Send("^a")
  ; Run saved do-file
  ; Double quotes around $dofile needed in case path contains blanks
  ClipPut("do " & '"' & $dofile & '"')
  ; Pause avoids problem with clipboard, may be AutoIt or Windows bug
  Sleep(100)
  Send("^v" & "{Enter}")
Else
  Run($statapath)
  WinWaitActive($statawin)
  ; Activate Stata Command Window
  Send("^4")
  ; Run saved do-file
  ; Double quotes around $dofile needed in case path contains blanks
  ClipPut("do " & '"' & $dofile & '"')
  ; Pause avoids problem with clipboard, may be AutoIt or Windows bug
  Sleep(100)
  Send("^v" & "{Enter}")
EndIf

Comments on script 1: In most cases, the script must be edited in two places before it can work on other computers:

  1. The variables $statapath and $statawin must match your configuration. $statapath contains the location of the Stata executable, which can be found with the Windows Explorer. The text in the variable $statawin is taken from the title of the main Stata window.
  2. The variable $dofile stores the location of the do-file. With EmEditor and TextPad, the path can be passed to the AutoIt script via the command line; this may also be possible with other editors. An alternative is to extract the path from the title of the editor window; the script shows how this can be done with EmEditor and TextPad. The AutoIt Window Info tool, a component of the AutoIt package, can help you find some of the information that is required with the alternative approach (window title, etc.).

What the script does: If Stata is already open, the script sends the path of the do-file from the editor to the Command window in Stata, preceded by "do" and followed by Enter. If more than one instance of Stata is open, the do-file is executed in the Stata window that was most recently active. If Stata is not open, the script starts Stata and then runs the do-file.

Important limitation: A do-file must be saved before running script 1 because the script looks for the saved version of the document that is currently being edited. An alternative would be to select the entire text and run script 2 below, which passes selected lines to Stata.


Script 2: Run individual commands from an external editor (download this script)

; AutoIt v3 script to run Stata commands from an external text editor.
; Version 2.2, Friedrich Huebler (fhuebler at gmail.com), 26 September 2005.
; Updated by Nicholas Winter (nw53 at cornell.edu), 25 May 2005.
; Adapted from a script by Eva Poen (eva.poen at unisg.ch), 27 June 2004.
; AutoIt is available at http://www.autoitscript.com/autoit3/.

; Declare variables
Global $statapath, $statawin, $commands, $tempfile, $tempfile2

; NOTE: Edit $statapath and $statawin before script is compiled
; Path to Stata executable
$statapath = "C:/Program Files/Stata9/wsestata.exe"
; Title of Stata window
$statawin = "Stata/SE 9.1"

; EXAMPLE: For Intercooled Stata 8.2 delete preceding block and use commands below
; $statapath = "C:/Program Files/Stata8/wstata.exe"
; $statawin = "Intercooled Stata 8.2"

; If more than one Stata window is open, the window
; that was most recently active will be matched
Opt("WinTitleMatchMode",2)

; Reduce SendKeyDelay and WinWaitDelay to speed up script
Opt("SendKeyDelay", 1)
Opt("WinWaitDelay", 200)

; Clear clipboard
ClipPut("")
; Copy selected lines from editor to clipboard
Send("^c")
; Pause avoids problem with clipboard, may be AutoIt or Windows bug
Sleep(100)
$commands = ClipGet()

; Terminate script if nothing selected
If $commands = "" Then
  Exit
EndIf

; Create file name in system temporary directory
$tempfile = EnvGet("TEMP") & "\statacmd.tmp"

; Open file for writing and check that it worked
$tempfile2 = FileOpen($tempfile,2)
If $tempfile2 = -1 Then
  MsgBox(0,"Error: Cannot open temporary file","at [" & $tempfile & "]")
  Exit
EndIf

; Write commands to temporary file, add CR-LF at end
; to ensure last line is executed by Stata
FileWrite($tempfile2,$commands & @CRLF)
FileClose($tempfile2)

; Check if Stata is already open, run it if not
If WinExists($statawin) Then
  WinActivate($statawin)
  WinWaitActive($statawin)
  ; Activate Stata Command Window and select text (if any)
  Send("^4")
  Send("^a")
  ; Run temporary file
  ; Double quotes around $tempfile needed in case path contains blanks
  ClipPut("do " & '"' & $tempfile & '"')
  ; Pause avoids problem with clipboard, may be AutoIt or Windows bug
  Sleep(100)
  Send("^v" & "{Enter}")
Else
  Run($statapath)
  WinWaitActive($statawin)
  ; Activate Stata Command Window
  Send("^4")
  ; Run temporary file
  ; Double quotes around $dofile needed in case path contains blanks
  ClipPut("do " & '"' & $tempfile & '"')
  ; Pause avoids problem with clipboard, may be AutoIt or Windows bug
  Sleep(100)
  Send("^v" & "{Enter}")
EndIf

Comments on script 2: In most cases, the script must be edited before it can work on other computers: The variables $statapath and $statawin must match your configuration. $statapath contains the location of the Stata executable, which can be found with the Windows Explorer. The text in the variable $statawin is the title of the main Stata window.

What the script does: The lines that are selected in the editor are saved in a temporary file. If Stata is already open, the script sends the path of the temporary file to the Command window in Stata, preceded by "do" and followed by Enter. If more than one instance of Stata is open, the commands are executed in the Stata window that was most recently active. If Stata is not open, the script starts Stata and then runs the selected commands.


Supported editors

The following editors are confirmed to work with the AutoIt scripts above:
  • Crimson Editor: Salmai Qari and Matthew Forbes informed me that the scripts can be linked to Crimson Editor as follows:
    1. Select "Conf. User Tools" from the "Tools" menu in Crimson Editor.
    2.a. Rundo script: Command: path to rundo.exe, e.g. C:\ado\rundo.exe, Argument: $(FilePath).
    2.b. Rundolines script: Command: path to rundolines.exe, e.g. C:\ado\rundolines.exe.
    3. Define Hot Keys as desired.
  • EditPlus: Thanks to Raul Sanchez for testing the scripts.
  • EmEditor: If you use EmEditor you may be interested in a Stata syntax file that I created for this editor. The syntax file is available free of charge at the EmEditor User Files page.
  • TextPad
  • UltraEdit: Robert White sent me these instructions for the configuration of UltraEdit. Go to Advanced and then Tool Configuration. For the rundo script, the command line should read:
    c:\stata\rundo.exe "%f"
    For the rundolines script, the command line should read:
    c:\stata\rundolines.exe do "%f"
    Next, set the working directory (for instance, C:\DATA) and choose a name for the menu item (for instance, rundo or rundolines). Make sure to check "Windows Program" and uncheck "Save Active File". To finish, click on the Insert button at right. rundo (rundolines) now appears at the bottom of the Advanced menu. Clicking on these entries calls Stata and runs the AutoIt executables.
    Marcos Delprato informed me that the rundo and rundolines commands can also be added to the UltraEdit toolbar. He also pointed out that the "Capture Output" option in the Output window has to be unchecked when the scripts are set up with UltraEdit.
Other authors have published modified versions of the scripts for other editors.
  • Any editor, including gVim: Jeffrey Arnold describes his modified version of the AutoIt scripts in a post to Statalist. In addition to other changes, he uses an INI file in text format that makes it unnecessary to specify the location of the Stata executable and the the title of the Stata window in the AutoIt script itself.
  • Hidemaru: Masakazu Hojo wrote a program called Hidomaru to integrate Stata with the Japanese Hidemaru editor.
  • jEdit: Dimitriy V. Masterov describes in a post to Statalist how to integrate Stata and jEdit.
  • Notepad++: Keith Kranker wrote a guide that describes how to run Stata files from Notepad++.
  • Notepad++: The original scripts are inconvenient if the Stata do-files are written with a semicolon as delimiter. (I personally use a carriage return as delimiter.) Ansgar Wolsing offers modified scripts for users who prefer a semicolon as delimiter.
  • Notepad++ and other editors: Stefan Gawrich modified the scripts so that do-files can be run from the start of the document to the current cursor position.
  • SciTE: Ari Friedman sent a message to Statalist in which he explains how to integrate Stata and SciTE.
  • Vim: Dimitriy V. Masterov describes in a post to Statalist how to integrate Stata and Vim.
  • WinEdt: Changhwan Kim and Haebong Woo explain how to adapt the AutoIt scripts to integrate WinEdt with Stata.
I would like to thank everyone who tested the scripts with other editors. Please write to me at fhuebler@gmail.com if you use the scripts with additional editors so that I can update this list. Some editors that can be used with Stata are described at "Some notes on text editors for Stata users".

History of the scripts

  • July 2004: First version of rundolines.au3 sent to the Stata mailing list (see Statalist archive).
  • October 2004: First version of this guide, with both scripts, released as part of "Some notes on text editors for Stata users".
  • March 2005: Scripts revised to work with Stata 7 and 8.
  • March 2005: Expanded guide added to my blog on education statistics.
  • April 2005: Guide and scripts added to my Web site, with direct download links.
  • 6 June 2005: Version 2.0 of scripts released, with support for Stata 9. The scripts are now compatible with Stata 7, 8, and 9. Scripts work with more than one instance of Stata. Scripts no longer rely on the built-in editor of Stata. New version of this guide.
  • 8 June 2005: Version 2.1 of scripts released. Fixed problem with the clipboard that was reported by some users: scripts no longer attempt to restore clipboard or text in Stata Command window.
  • 30 June 2005: Version 2.1.1 of rundolines script released, with minor bug fix related to clipboard.
  • 26 September 2005: Version 2.2 of scripts released. The scripts are now compatible with Stata 9.1, released on 15 September 2005.
  • 22 June 2006: New section added to this guide: Supported editors.
  • 28 January 2007: The list of supported editors now includes EmEditor, gVim, Hidemaru, jEdit, Notepad++, SciTE, TextPad, Vim, UltraEdit, and WinEdt.
  • 26 April 2008: The following editors have been confirmed to work with the scripts: Crimson Editor, EditPlus, EmEditor, gVim, Hidemaru, jEdit, Notepad++, SciTE, TextPad, Vim, UltraEdit, and WinEdt.
  • 27 April 2008: Version 3 of the rundo and rundolines programs released. This document is no longer maintained and has been replaced by a new guide to integrating Stata and external text editors.

Known problems

In rare cases, no command is passed to Stata; if this happens the script should be called a second time, after which it will usually work. This problem is due to the way the clipboard is handled and I don't know if this is a bug in AutoIt or in Windows. If a script fails, you can increase the time in the Sleep commands and recompile the scripts. For example, use Sleep(200) instead of Sleep(100), where the number indicates the pause in milliseconds. Up to version 2.0 the scripts attempted to restore the contents of the clipboard and/or the Stata Command window. I removed this feature starting with version 2.1 because of the clipboard problem. Version 2.0 of the scripts can still be downloaded but I strongly recommend the most recent version instead: rundo20.zip, rundolines20.zip.

Acknowledgments
  • I am building on previous work by Dimitriy Masterov and Eva Poen. Masterov demonstrated in a post to the Stata mailing list how a do-file can be executed from Vi (see Statalist archive). Poen followed up by showing how individual lines can be executed from WinEdt (see Statalist archive).
  • Nicholas Cox prompted me to write this guide as a contribution to "Some notes on text editors for Stata users," a FAQ that he maintains.
  • Amanda Tzy-Chyi Yu brought to my attention that one of the scripts did not work with Stata 7 and helped by testing new versions of the scripts.
  • Nicholas Winter updated the scripts so that they work with Stata 9. He also made the scripts more efficient by finding a solution that does not require the Do-file Editor of Stata and suggested using Sleep() to avoid the problem with the clipboard.
Please leave comments and corrections at the "Post a comment" link below or send a message to fhuebler@gmail.com. Thank you.

Related articlesFriedrich Huebler, 10 March 2005 (edited 3 May 2008), Creative Commons License
Permanent URL: http://huebler.blogspot.com/2005/03/integrating-stata-and-external-text.html

Tuesday, March 8, 2005

Recommended freeware

Friedrich Huebler, 8 March 2005 (edited 1 February 2009), Creative Commons License
Permanent URL: http://huebler.blogspot.com/2005/03/recommended-freeware.html